Getting Started with PlatformIO – Unified IDE for Embedded Software Development
If you’re eager to explore the exciting realm of embedded electronics or you’re itching to infuse a touch of innovation into that Christmas light display you want to build, you’re in for a thrilling journey. The world of embedded development is a vast and vibrant landscape, filled with numerous manufacturers, product series, architectures, development boards, toolchains, IDEs, and an abundance of software and hardware options.
Navigating this diverse landscape can be both exhilarating and overwhelming. However, fear not! In this tutorial, we’ll introduce you to PlatformIO, a powerful and user-friendly platform designed to simplify the embedded software development process. PlatformIO streamlines tasks such as managing microcontrollers, toolchains, libraries, dependencies, debugging, and testing, so you can spend less time on setup and more time bringing your creative ideas to life.
In the following sections, we’ll guide you through the process of getting started with PlatformIO, from installation and configuration to creating your first embedded project. By the end of this tutorial, you’ll be well-equipped to embark on your embedded development journey, and your Christmas lights will dazzle with your unique touch.
What is PlatformIO?
PlatformIO is a unified embedded software development ecosystem that brings multiple microcontroller/microprocessor architectures, products, toolchains, libraries, and hardware under one roof. It was developed by PIO Labs with origins in the Ukraine 🇺🇦. It is a free and open-source project consisting of multiple platform definitions, toolchains, board definitions, framework repositories, libraries, examples, add-on software components, and documentation. The main component of PlatformIO (PIO) is a CLI (Command Line Interface) tool or a software add-on usually installed as an extension to an existing IDE (Integrated Development Environment). PlatformIO can be incorporated into popular IDEs like Eclipse, VS Code, CLion, etc, but Visual Studio Code is by far the best-supported and recommended IDE. PIO can be installed as a free extension to VS Code from the marketplace. It will install everything you need on your computer, regardless of which operating system you are using. We used to use PIO with Atom IDE a few years ago. Let’s learn more about the features of PlatformIO in the next section.
Since PlatformIO is a free and open-source project, it relies on donations from its users and businesses to maintain the project. If you find PIO useful for your work, please consider donating to PlatformIO.
Features
Here we will explain the features and components of the PlatformIO ecosystem. This is not a comprehensive coverage of all the features but an important few. To learn more about them, you can always visit the PIO website.
IDE
PlatformIO does not have a standalone IDE. It has to be incorporated into an existing IDE to be able to have a front-end for development. You could use any IDEs that support invoking command-line applications for doing tasks. Since PIO is available as a CLI tool, you can launch the terminal and ask PIO to compile a project, for example. This process is made easier using the official plugins or extensions available for various IDEs. The recommended IDE for PlatformIO is Visual Studio Code (VS Code) and you can install the PIO extension free from the VS Code marketplace.
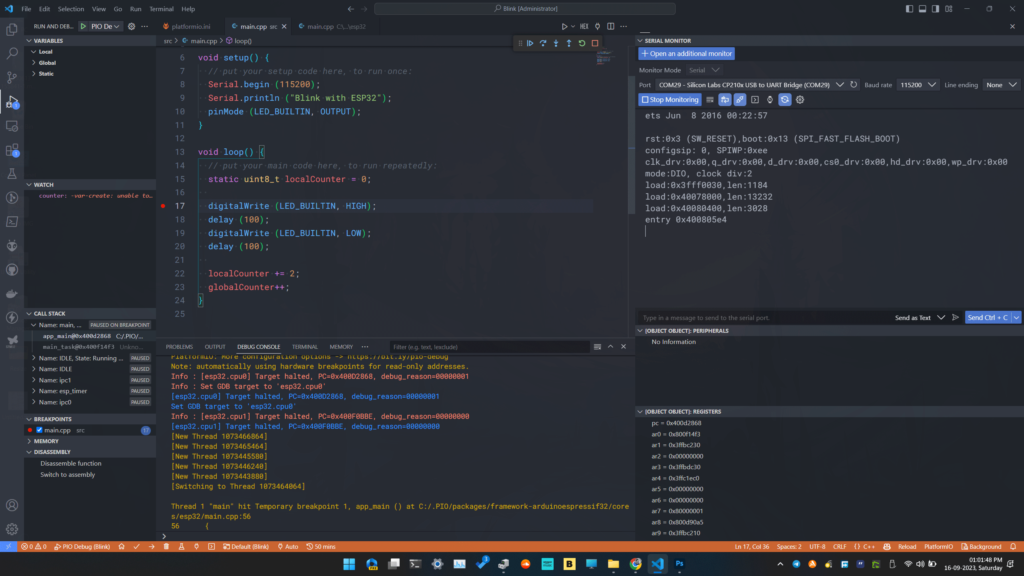
The IDE provides code editing features, file explorer, syntax highlighting, code completion, IntelliSense, and version control, among other things. The PIO extension in the background will allow you to manage your projects, and build, upload, and debug embedded firmware. The PIO extension can recognize what type of files you are working with, the workspace file structure, and mainly detect the platformio.ini configuration file. If it detects a valid configuration file, the extension will automatically show the buttons and menus necessary for the development in addition to the native features of VS Code.
CLI
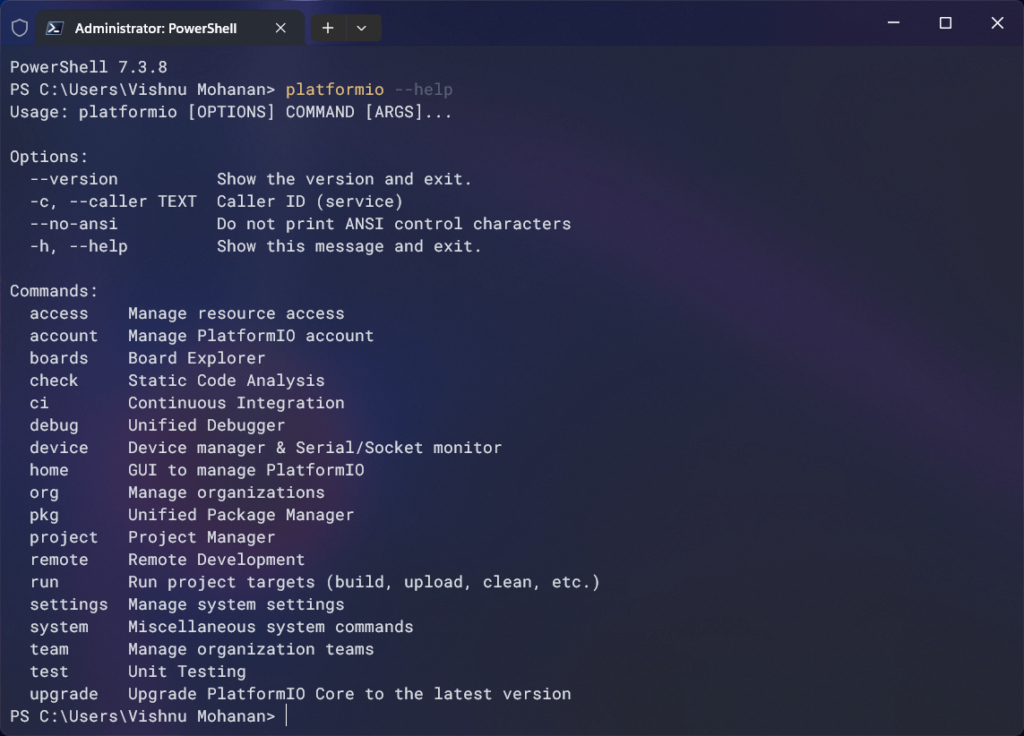
PlatformIO core is available as a command-line utility. This tool can be invoked from a terminal or command-line interface (CLI) to build your projects, upload code to a target board, and manage libraries and other dependencies. If the IDE of your choice doesn’t have a PlatformIO extension, then PlatformIO CLI is the tool you need. PlatformIO CLI can be installed separately to be invoked from the Terminal anywhere. Otherwise, the tool will be installed as part of the IDE extension and you can invoke PIO from the terminal inside the IDE.
Platforms
In the context of PlatformIO, platforms mean hardware platforms from various manufacturers. For example, AVR is a microcontroller architecture and platform from Atmel (now Microchip). There are 100s of different variants of AVR microcontrollers and all of them are supported by the same platform in terms of code, libraries, and tools. You could use the AVR compiler to compile code for all AVR microcontrollers. For code flashing and debugging, you could use official tools like AVR ISP, or Atmel ICE. So that is one platform. Similarly, there are other platforms like SAM, MCS51, PIC, PIC32, STM32, ARM Cortex, MSP430, MSP432, LPC, XMC, Kinetis, and more. PlatformIO supports 40+ such platforms of which some are directly supported by the manufacturers. You can find the list of supported platforms on the PIO website.
Frameworks
An embedded development framework is a set of abstraction layers implemented as libraries on top of the native toolchains provided by the manufacturer. A framework often aims to simplify and unify the embedded development process and can also use a different programming language than what is officially supported. One of the popular frameworks is the open-source Arduino framework. Arduino was meant to help artists and hobbyists incorporate microcontrollers and sensors into hobby projects and interactive artworks without going through the steep learning curve of a professional embedded development system. PlatformIO supports more than 20+ frameworks at the moment.
Boards
Boards are the targets to which a compiled firmware will be uploaded. The board should be based on a supported microcontroller and should have an interface supported by PIO for uploading. Boards can be bought from framework vendors such as Arduino, Adafruit, SparkFun, etc. You could also design your own boards by either keeping software and hardware compatibility with an existing board or by customizing the design on your own. If you have a customized design, you can always create a custom board definition for PIO and even add it to the official list of supported boards.
Flashing
Flashing refers to uploading firmware in binary form to a target microcontroller system. The process transfers the binary file to a memory. Various tools and interfaces can be used for flashing code. A serial bootloader can accept firmware through a UART interface but requires a special bootloader application running in the microcontroller. In PlatformIO an interface used for uploading code is called a protocol and they include JTAG, SWD, Serial, ISP, ICSP, etc. A standalone hardware tool used for uploading code is called a tool and it includes AVR ISP, CMSIS-DAP, ST-Link, J-Link, etc.
Debugging
Embedded software debugging is supported by PlatformIO as long as you use a supported interface and debug tool. Debugging is usually facilitated by a dedicated tool called debug probe which can be connected to the target system. You can halt/resume the CPU, look at the registers, check memory data, dump firmware, and do more with debugging.
Static Code Analysis
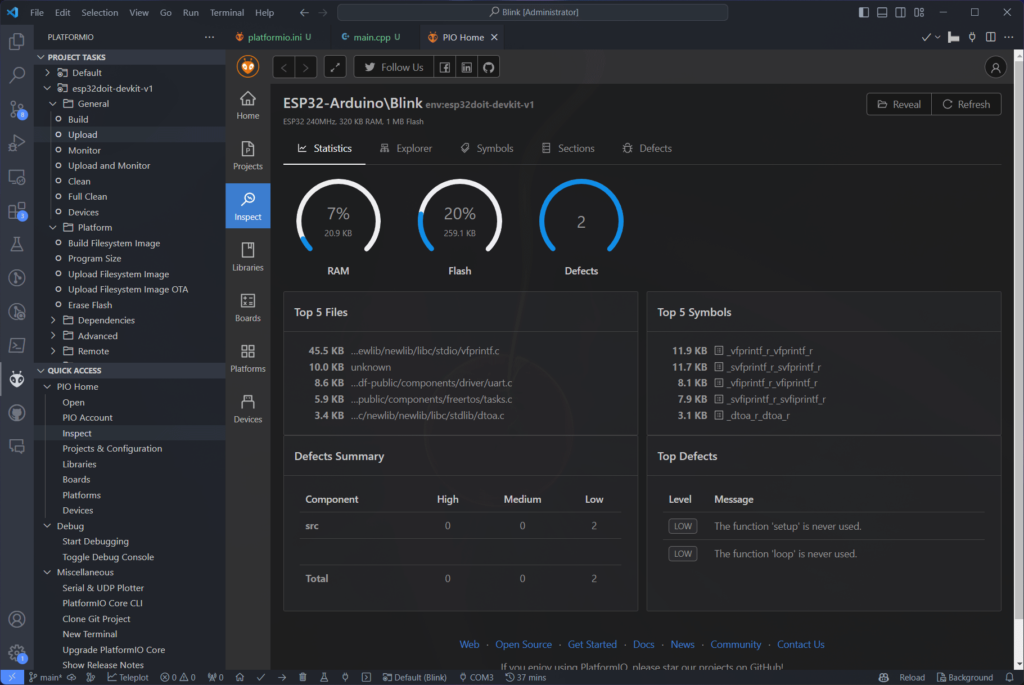
There are infinite ways to write the same program. If so, not all methods can not be best in terms of performance, efficiency, and latency. When developing embedded firmware with PlatformIO, you can make use of the Static Code Analysis feature of PIO to analyze your code for potential problems and for ways to improve the performance. It can show you how much memory you are using, how much overhead you need to execute a certain part of the program etc. Suggestions from the code analysis results can be used to optimize your code for best performance.
Unit Testing
Unit Testing is the concept of testing your code individual parts at a time, instead of testing the whole program at once as it is usually done. Input-output relations can be specified as test conditions referred to as unit tests, and if the tests are passed we can be confident that the program will work as expected. Such segregated testing can tell us about potential problems in the code way earlier than they would pop up in the actual scenario.
Remote Development
PlatformIO also supports remote development and debugging of embedded projects deployed elsewhere. A remote agent running on the target system can facilitate debugging, firmware upgrades, and serial communication remotely through the internet.
Installing
You need to install both VS Code and the PlatformIO extension to follow this tutorial. We will be using a Windows 11 64-bit machine here. Even if you have a different operating system, the steps will be similar and you should have no issues replicating it on your computer.
VS Code
You can download the VS Code installer suitable for your operating systems from the official website. There are two types of installers for VS Code.
- System Installer – this is used for operating systems with the main user as the sole administrator of the system. This installer and subsequently the VS Code installation runs with administrator privileges. If you are the admin of your system, you can choose this installer.
- User Installer – this can be used by a user of an operating system without admin privileges. VS Code will not need admin privileges to run. If you are not an admin of your system (for example, if the computer is provided by your employer), you can choose the user installer. When a user-installed VS Code is run with admin privileges, automatic updates will be paused.
We also recommend installing the following extensions that can boost your productivity with VS Code.
If you are new to VS Code IDE and want to learn the basics of a modern IDE, please check out the following tutorial from us. Even though the tutorial focuses on Arduino development with VS Code, the basic features and usage are the same.
How to Use VS Code for Creating and Uploading Arduino Sketches
PIO Extension
Before installing the PIO extension, we suggest you set the core directory for PlatformIO. The core directory is where all of your PIO-related files such as toolchains, configurations, and other downloaded files are stored. If you do not set a core directory before installing the extension, PIO will automatically choose a default path on your system. The location of the core directory is determined by the core_dir configuration variable. Following are the default paths.
- Unix –
~/.platformio - Windows –
%HOMEPATH%\.platformio
There can be a problem with the default paths. If there are whitespaces on your path name, some toolchains can fail to work (for example ESP-IDF). To circumvent the issue, you can set the core_dir using the PLATFORMIO_CORE_DIR environment variable. In Windows, you can open the Environment Variable window and create a new user variable called PLATFORMIO_CORE_DIR and set the value of that variable to a suitable path on your system. The path should be short and free from whitespaces. In our case, the core directory is located at C:\.PIO. Keep in mind that the core directory is not where you will save your project files. You can save your projects anywhere else. You can open a folder as a VS Code workspace using the context menu option Open with Code.
Now you can open the extensions tab in VS Code and search for “platformio”. You need an active internet connection for this to work. Additionally, you can also go to the marketplace and click the Install button there. It will open the VS Code IDE automatically and prompt for installation.
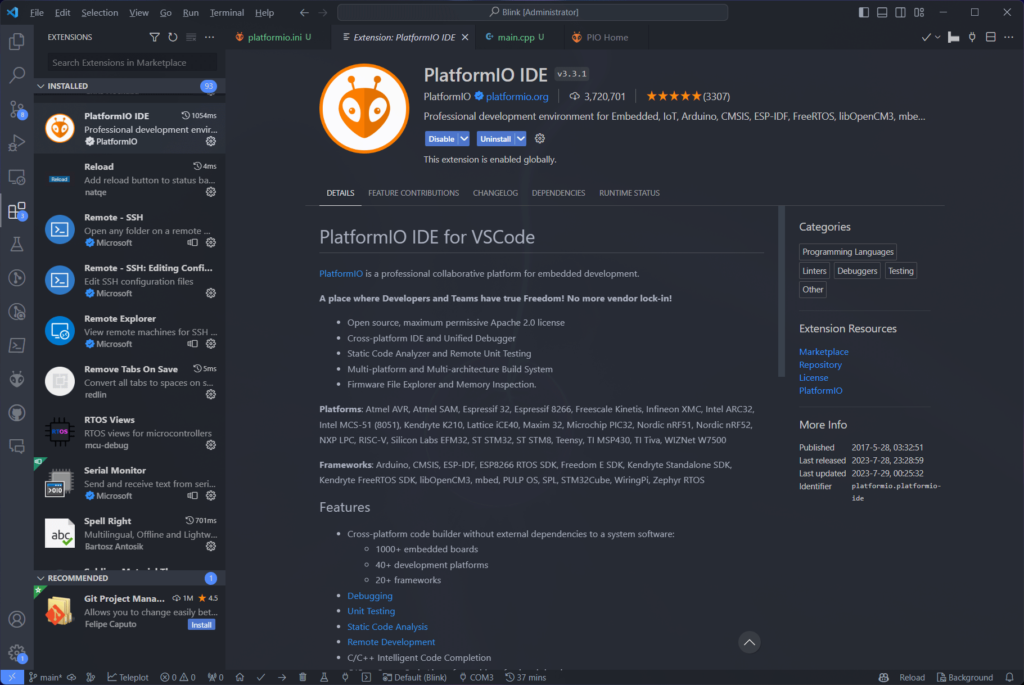
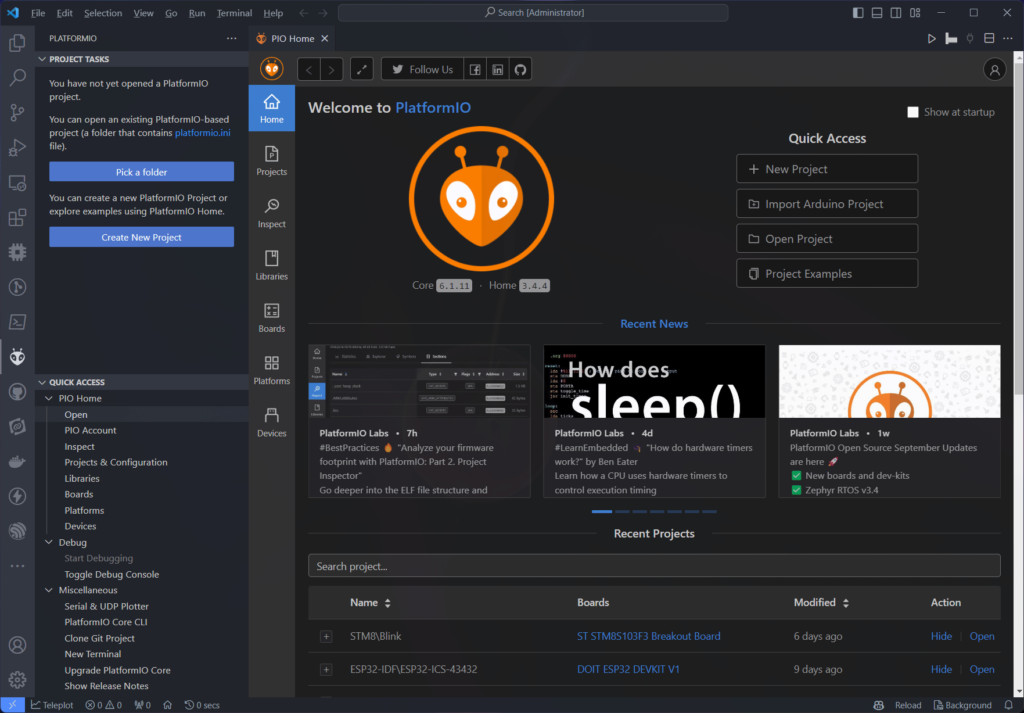
After installing, a new “alien head” icon will appear on the left. Click on it to open the PIO Home page. There you will find a list of all of your projects, installed platforms, frameworks, boards, etc. You can create new projects or import existing projects. Check out the Example Project section to see how you can create a new project in PlatformIO.
Project File Structure
When you create a PlatformIO project, the PIO extension will create a few folders and files inside the root folder (project_dir). The following is a list of basic files created initially.
project_dir
├── lib
│   └── README
├── include
│   └── README
├── test
│   └── README
├── platformio.ini
└── src
└── main.cppAdditionally, VS Code also creates a few folders and files as shown below. The JSON files contain settings used by VS Code and will be applicable only if the project_dir is opened as a workspace directory.
project_dir
├── .vscode
│   ├── c_cpp_properties.json
│   ├── extensions.json
│   └── launch.json
├── .pio
│   └── build
│   └── libdeps
├── include
│   └── README
├── lib
│   └── README
├── test
│   └── README
├── platformio.ini
└── src
└── main.cppinclude
The include is a directory for storing all of your project-specific header files. You can then include these files in your main.cpp source file using the #include directive. The folder contains a README file that explains the usage of the folder.
This directory is intended for project header files.

A header file is a file containing C declarations and macro definitions
to be shared between several project source files. You request the use of a
header file in your project source file (C, C++, etc) located in `src` folder
by including it, with the C preprocessing directive `#include'.

```src/main.c

#include "header.h"

int main (void)
{
 ...
}
```

Including a header file produces the same results as copying the header file
into each source file that needs it. Such copying would be time-consuming
and error-prone. With a header file, the related declarations appear
in only one place. If they need to be changed, they can be changed in one
place, and programs that include the header file will automatically use the
new version when next recompiled. The header file eliminates the labor of
finding and changing all the copies as well as the risk that a failure to
find one copy will result in inconsistencies within a program.

In C, the usual convention is to give header files names that end with `.h'.
It is most portable to use only letters, digits, dashes, and underscores in
header file names, and at most one dot.

Read more about using header files in official GCC documentation:

* Include Syntax
* Include Operation
* Once-Only Headers
* Computed Includes

https://gcc.gnu.org/onlinedocs/cpp/Header-Files.html
lib
The lib folder is for storing all your project-specific libraries. There can be multiple libraries with source files and header files and each library should have its own folders. For example, you can copy a library from GitHub to the lib directory. PIO will find all the source files and header files from the directories automatically. There is a README file inside the lib folder that explains the usage.
This directory is intended for project specific (private) libraries.
PlatformIO will compile them to static libraries and link into executable file.

The source code of each library should be placed in a an own separate directory
("lib/your_library_name/[here are source files]").

For example, see a structure of the following two libraries `Foo` and `Bar`:

|--lib
|  |
|  |--Bar
|  |  |--docs
|  |  |--examples
|  |  |--src
|  |     |- Bar.c
|  |     |- Bar.h
|  |  |- library.json (optional, custom build options, etc) https://docs.platformio.org/page/librarymanager/config.html
|  |
|  |--Foo
|  |  |- Foo.c
|  |  |- Foo.h
|  |
|  |- README --> THIS FILE
|
|- platformio.ini
|--src
   |- main.c

and a contents of `src/main.c`:
```
#include <Foo.h>
#include <Bar.h>

int main (void)
{
  ...
}

```

PlatformIO Library Dependency Finder will find automatically dependent
libraries scanning project source files.

More information about PlatformIO Library Dependency Finder
- https://docs.platformio.org/page/librarymanager/ldf.html
test
test is a folder where your unit test routines are stored. Following is the README file that explains the usage of the folder.
This directory is intended for PlatformIO Test Runner and project tests.

Unit Testing is a software testing method by which individual units of
source code, sets of one or more MCU program modules together with associated
control data, usage procedures, and operating procedures, are tested to
determine whether they are fit for use. Unit testing finds problems early
in the development cycle.

More information about PlatformIO Unit Testing:
- https://docs.platformio.org/en/latest/advanced/unit-testing/index.html
.pio/build
This directory will be created when you start building your project. All the compiled binaries and static files will be stored in this directory. You can find files like HEX, ELF, etc, in this folder. PIO will create separate sub-directories if you have multiple build environments. Since all of the files in these folders are generated automatically, editing them will not have any effect on your code. Also, deleting or modifying any files will force PIO to completely rebuild your project the next time.
.pio/libdeps
This is where the build files for libraries and other dependencies are stored.
platformio.ini
platformio.ini is the main configuration file for PlatformIO. This file has to always reside in the root directory of your project. When you open a folder in VS Code as a workspace, the PIO extension will automatically detect this configuration file and set the PIO extension ready for development. We will learn about this file in the next section.
src
src is the main source directory of a PlatformIO project. A main.c or main.cpp file is automatically created inside this folder when you first create a PIO project. You can include extra source files in the same folder.
main.c
This is the source file containing the entry point of the application. If you are using frameworks such as Arduino, the main.c will not be the actual entry point but a separate main file is created in the background to convert your Arduino sketch to a proper C/C++ file. Even if you are using Arduino as the framework, you don’t need to change the type of main file to an .ino type. Always keep it as main.c or main.cpp.
Configuration
As we said earlier, platformio.ini is the main configuration file for PlatformIO. Almost all configurations required for PIO to work are stored here. There can be default configurations for all settings. So it is not necessary to include all configurations in your project configuration file. PIO will use the default configuration if a certain configuration is not defined in your platformio.ini file. However, if you do define the configuration in the platformio.ini file, the default configuration is automatically overridden.
The paltformio.ini file is an INI-style file with separate sections denoted by square brackets ([]). You can define multiple build environments using sections. Each section will have its own set of key-value pairs. You can switch the build environments easily from the PIO front-end. Following is an example configuration file.
; PlatformIO Project Configuration File
;
;   Build options: build flags, source filter, extra scripting
;   Upload options: custom port, speed and extra flags
;   Library options: dependencies, extra library storages
;
; Please visit documentation for the other options and examples
; https://docs.platformio.org/en/latest/projectconf/index.html

[env:uno]
platform = atmelavr ;the hardware platform to be used
framework = arduino ; the framwork
board = uno ;the unique board identifier

[env:nodemcuv2]
platform = espressif8266
framework = arduino
board = nodemcuv2

[env:teensy31]
platform = teensy
framework = arduino
board = teensy31There are three environments defined in the file – uno, nodemcuv2, and teensy31. An environment section should start with env: and the name of the environment should not contain any spaces. Use underscore (_) character for word separation. Each section also contains its own three key-value pairs. The keys come first followed by a value separated by a = character.
As we have explained before, the platform key specifies one of the supported platforms to be used in that environment. The list of possible values can be found on the PIO website. There must be only one platform key in an environment. The framework key specifies the framework to be used and the board key specifies the unique board name. Both these have a list of possible values and you must use one of them. You can not simply add a random value of your choice.
As you may have already noticed, the configuration file supports comments starting with a ; character. Comments can take up entire lines or be added as part of a valid configuration file. Below is another configuration file with more options.
[platformio]
default_envs = nodemcuv2

; custom common options
[common]
build_flags =
    -D VERSION=1.2.3
    -D DEBUG=1
lib_deps_builtin =
    SPI
    Wire
lib_deps_external =
    bblanchon/ArduinoJson @ ~5.6,!=5.4
    https://github.com/gioblu/PJON.git#v2.0
    IRremoteESP8266=https://github.com/markszabo/IRremoteESP8266/archive/master.zip

[env:nodemcuv2]
platform = espressif8266
framework = arduino
board = nodemcuv2

; Build options
build_flags =
    ${common.build_flags}
    -DSSID_NAME=HELLO
    -DSSID_PASWORD=WORLD

; Library options
lib_deps =
    ${common.lib_deps_builtin}
    ${common.lib_deps_external}
    https://github.com/me-no-dev/ESPAsyncTCP.git
    knolleary/PubSubClient@^2.8
    paulstoffregen/OneWire

; Serial Monitor options
monitor_speed = 115200
monitor_flags =
    --encoding
    hexlify

; Unit Testing options
test_ignore = test_desktop

[env:bluepill_f103c8]
platform = ststm32
framework = arduino
board = bluepill_f103c8

; Library options
lib_deps = ${common.lib_deps_external}

; Debug options
debug_tool = custom
debug_server =
    ${platformio.packages_dir}/tool-jlink/JLinkGDBServer
    -singlerun
    -if
    SWD
    -select
    USB
    -port
    2331
    -device
    STM32F103C8

; Unit Testing options
test_ignore = test_desktop[platformio] is a section to override the default working configuration for PIO. In the file, only the default_envs is overridden. You can find all options in the PIO docs.
[common] is a section that defines all common options and configurations for all environment sections. So you don’t need to duplicate the configuration key for each env section.
Under the common or env sections, you can have multiple working configurations. The possible key-value pairs are listed on the PIO docs. Following are a few of the most commonly used configuration keys.
lib_deps– This can be used to specify local or remote libraries for your projects. Remote libraries can be added as a link and PIO will fetch them and save them to the lib directory. Local libraries are not copied over, but fetched only during compilation/building. You can have multiple values separated by a line break and space.build_flags– The values added here are applied for pre-processing, compiling, and linking processes. For example, if your code checks for the presence of some pre-processor directive, you can enable or disable them using this key. You can have multiple values here separated by line breaks and spaces.monitor_speed– The serial monitor speed in bps.upload_port– Specifies the upload port of the board if applicable. This is only used if your board uses a serial COM port for firmware uploading. The value can beCOM3, for example.debug_tool– Specifies the type of debug tool (debug probe) or protocol to be used when launching a debug session. For example,jlink.
The platformio.ini file is not the only way you can configure your projects. PIO also offers a GUI for adding or modifying configurations. You can open this from the PlatformIO QUICK ACCESS → Projects & Configuration menu. The interface will list all your projects.
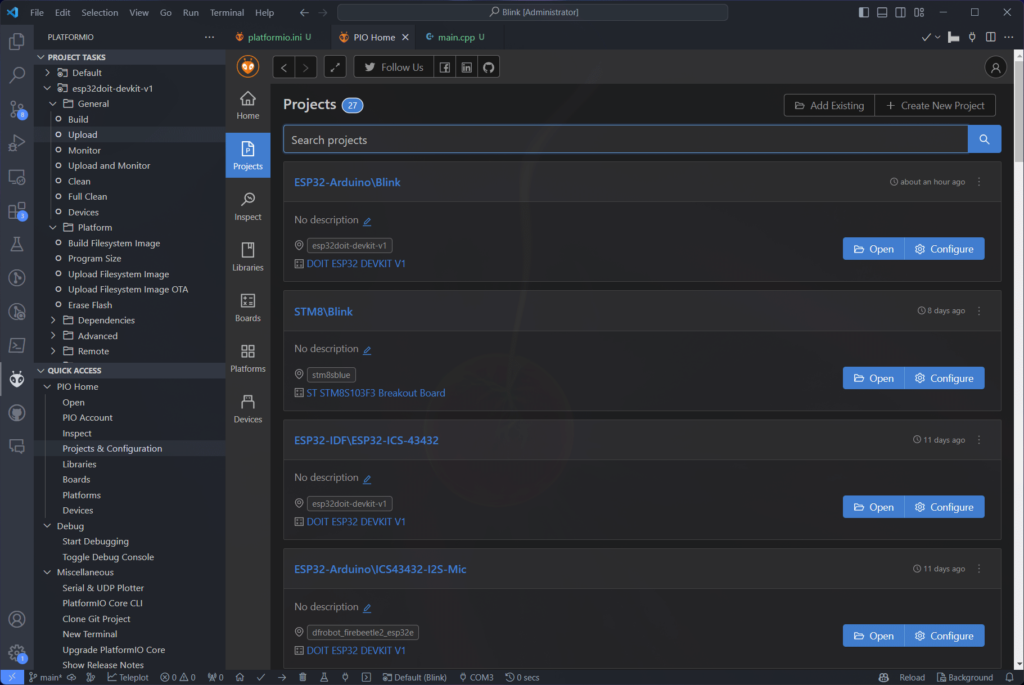
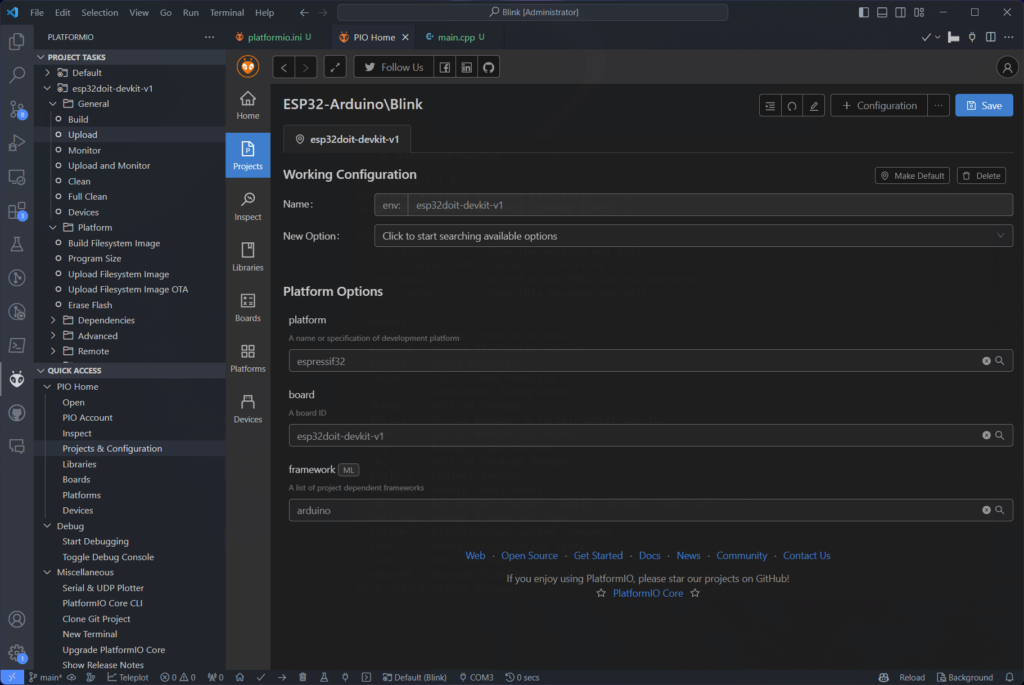
If you click on the Configure button, it will open the project configuration window. The configurations you see there will match what you have in the platformio.ini file. When you add or modify configuration through the interface, it is automatically updated on the platformio.ini file.
Board Definitions
If you are wondering where your board definitions and related configurations are stored, you can find them in the core_dir → platforms folder. Since we are going to use the ESP32 Arduino framework, the toolchain and board definitions will be stored under core_dir → platforms → espressif32 folder. Inside that folder, you will find another folder named boards which holds all the supported board definitions. The DOIT ESP32-DevKit V1 board definition is found in the file esp32doit-devkit-v1.json.
{
  "build": {
    "arduino":{
      "ldscript": "esp32_out.ld"
    },
    "core": "esp32",
    "extra_flags": "-DARDUINO_ESP32_DEV",
    "f_cpu": "240000000L",
    "f_flash": "40000000L",
    "flash_mode": "dio",
    "mcu": "esp32",
    "variant": "doitESP32devkitV1"
  },
  "connectivity": [
    "wifi",
    "bluetooth",
    "ethernet",
    "can"
  ],
  "debug": {
    "openocd_board": "esp-wroom-32.cfg"
  },
  "frameworks": [
    "arduino",
    "espidf"
  ],
  "name": "DOIT ESP32 DEVKIT V1",
  "upload": {
    "flash_size": "4MB",
    "maximum_ram_size": 327680,
    "maximum_size": 4194304,
    "require_upload_port": true,
    "speed": 460800
  },
  "url": "http://www.doit.am/",
  "vendor": "DOIT"
}Arduino Board Options
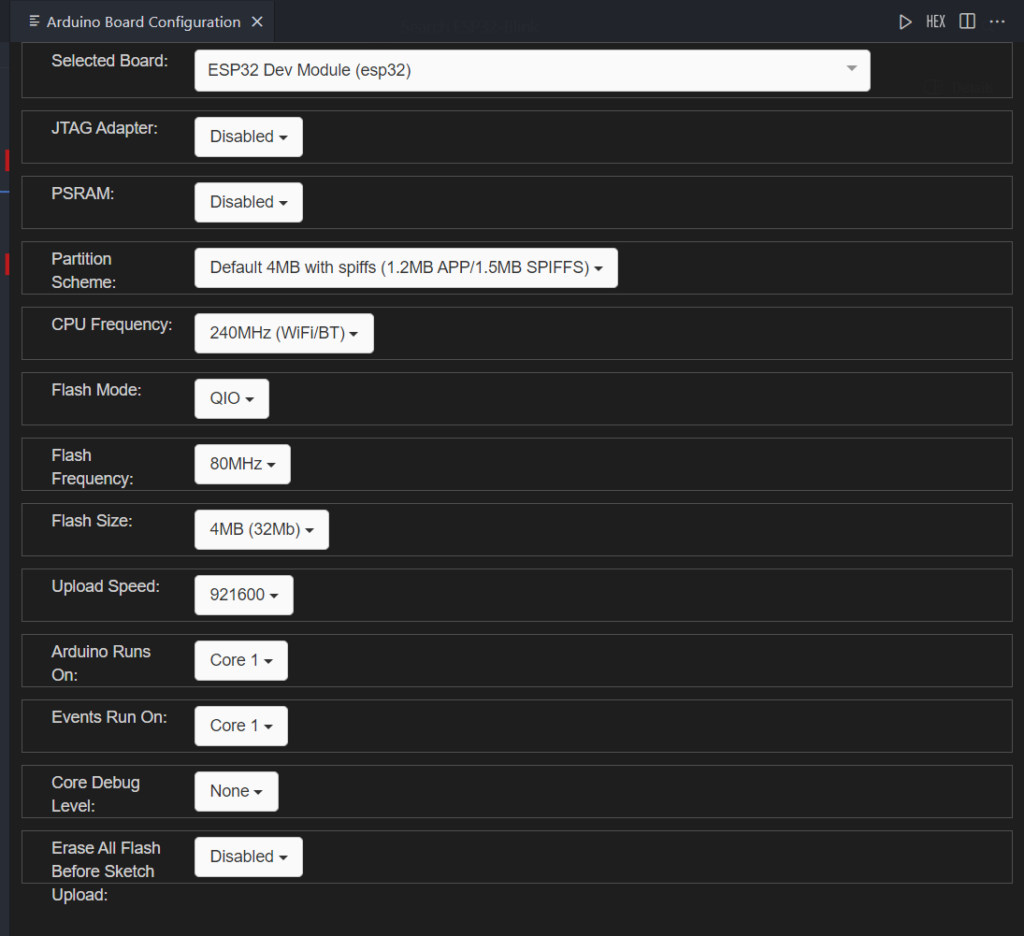
Some Arduino-supported boards give you an extra menu in the Arduino IDE to quickly switch between some configurations. These settings are added as menu options in the boards.txt file of Arduino. So where do you find that menu in PlatformIO? The answer is you can’t. There is no direct equivalent to Arduino board options in PlatformIO. This is something PlatformIO falls short of when attracting the huge community of Arduino users. But it is nothing serious, because most of the configuration can be, as you guessed, specified in the platformio.ini configuration file. But you have to figure out which configuration keys you will need and which macros to enable/disable. But finding them can be a little difficult.
Example Project
We will create an example PlatformIO project called Blink using the DOIT ESP32-DevKit V1 board and the Arduino framework. We are using the DOIT board because we think it is one of the cheapest and most easily accessible boards out there. Feel free to change the board to any other Arduino-supported one. As long as it is supported by PlatformIO and has an LED, we can blink it.
Creating New Project
Open the PlatformIO Home page to find the option to create a new project. Click on the + New Project button to open the project wizard.

We are naming the project Blink and using the DOIT ESP32 DevKit V1 as the target board. We are going to use the Arduino framework for writing the program. The list will show all frameworks supported by the board. In this case, the DevKit is supported by Arduino and ESP-IDF frameworks.
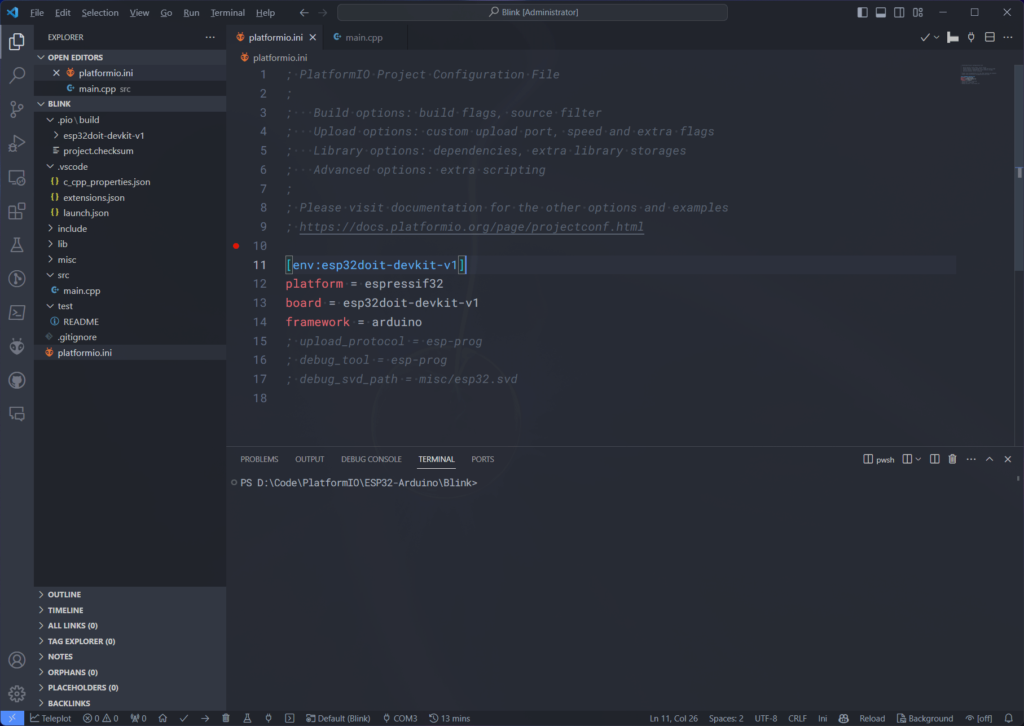
It can take some time to download the toolchain and other software components when you do this for the first time. However, once a toolchain is downloaded, creating new projects with the same toolchain won’t take much time. As soon as the project is created PIO will create the necessary files and folder structures in the root directory. Following is the platformio.ini configuration file we have.
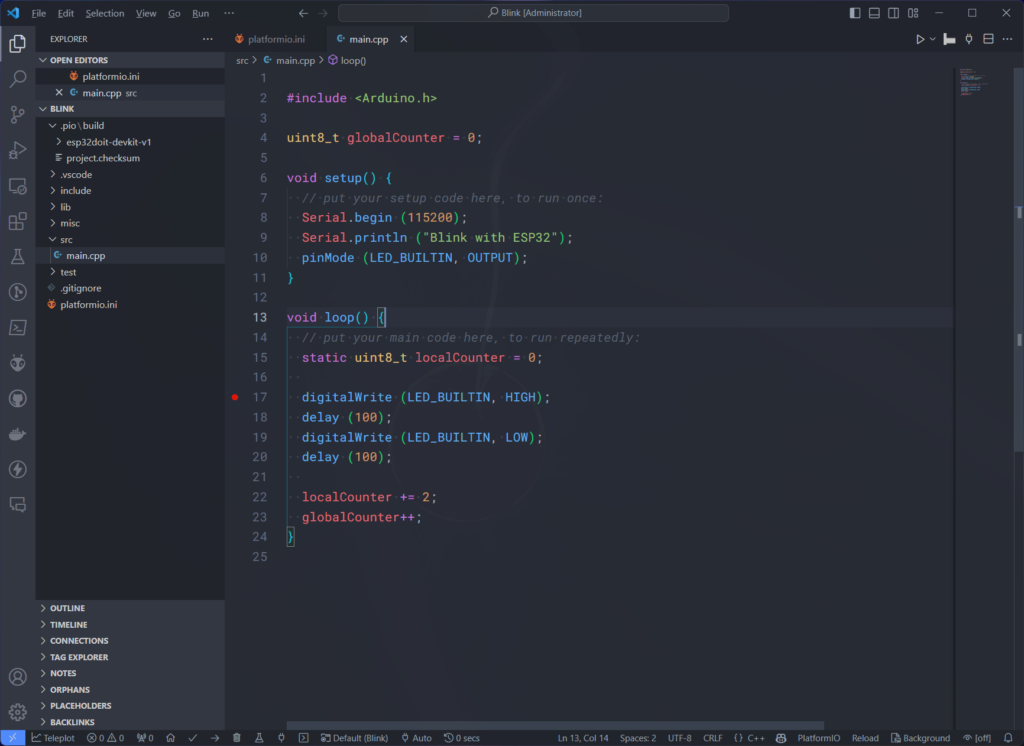
The main.cpp file may initially contain some template code or can be empty. We are going to use the following code for blinking the built-in LED connected to GPIO2. There are a few other statements, which we will use to demo the debugging feature.
#include <Arduino.h>

uint8_t globalCounter = 0;

void setup() {
  // Put your setup code here, to run once:
  Serial.begin (115200);
  Serial.println ("Blink with ESP32");
  pinMode (LED_BUILTIN, OUTPUT);
}

void loop() {
  // Put your main code here, to run repeatedly:
  static uint8_t localCounter = 0;

  digitalWrite (LED_BUILTIN, HIGH);
  delay (100);
  digitalWrite (LED_BUILTIN, LOW);
  delay (100);

  localCounter += 2;
  globalCounter++;
}
Building
You can copy and paste the code provided above. After that, we can start compiling the code, which is also called building. Building your project can be done in multiple ways. The easiest is to find the build button with a checkmark icon (✔️). Additionally, you can find the options in the PlatformIO sidebar under esp32doit-devkit-v1 category (if your build environment has the same name).
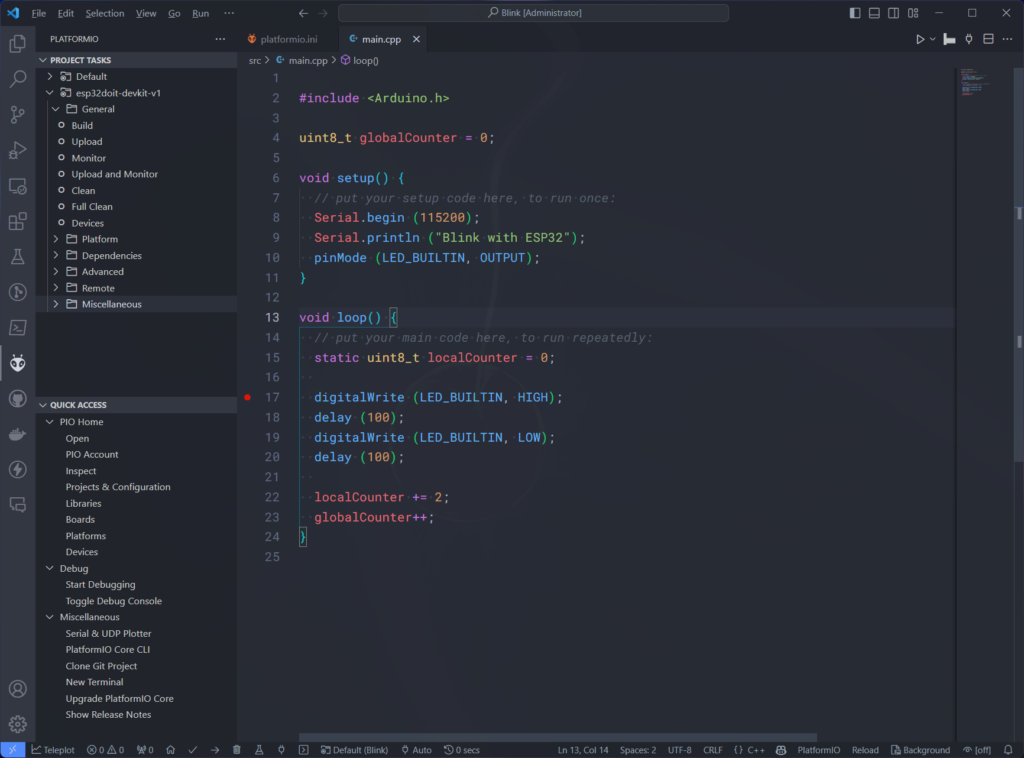
- Build – builds the project and saves the compiled binary files (hex, elf, etc) to the .pio/build directory. The build process will fail if you have any errors in the code or configuration.
- Upload – if you have specified a method for uploading the firmware to the board, PIO will use the method to flash the code. If you have not specified a method, PIO will still try to use the default method. If a required interface is not found or is not in the correct state, the upload process will fail.
- Monitor – PIO can connect to your board’s serial port through the terminal. Monitor option is to open the serial port. You must specify the monitor configuration in the platformio.ini file. Otherwise, PIO will use the default configuration.
- Upload and Monitor – Immediately open the serial monitor after uploading the code.
- Clean – delete the build files or any cached build files. PIO will only compile files that are modified. If a file is not modified after the last compilation, PIO will use the already compiled file to save compilation time. But sometimes you want to build everything afresh.
- Full Clean – deletes the libdeps folder contents in addition to the build files.
- Devices – lists the serial devices to the terminal.
Yet another way to build your project is from the PIO command-line. Use the following command to build your project. You can launch a new PIO terminal from QUICK ACCESS → New Terminal.
pio run -e esp32doit-devkit-v1Following is the PlatformIO project build log printed to the console.
 *  Executing task: C:\.PIO\penv\Scripts\platformio.exe run --environment esp32doit-devkit-v1

Processing esp32doit-devkit-v1 (platform: espressif32; board: esp32doit-devkit-v1; framework: arduino)
-----------------------------------------------------------------------------------------------------------------------------------------
Verbose mode can be enabled via `-v, --verbose` option
CONFIGURATION: https://docs.platformio.org/page/boards/espressif32/esp32doit-devkit-v1.html
PLATFORM: Espressif 32 (6.4.0+sha.f6ec392) > DOIT ESP32 DEVKIT V1
HARDWARE: ESP32 240MHz, 320KB RAM, 4MB Flash
DEBUG: Current (cmsis-dap) External (cmsis-dap, esp-bridge, esp-prog, iot-bus-jtag, jlink, minimodule, olimex-arm-usb-ocd, olimex-arm-usb-ocd-h, olimex-arm-usb-tiny-h, olimex-jtag-tiny, tumpa)
PACKAGES:
 - framework-arduinoespressif32 @ 3.20011.230801 (2.0.11)
 - tool-esptoolpy @ 1.40501.0 (4.5.1)
 - toolchain-xtensa-esp32 @ 8.4.0+2021r2-patch5
LDF: Library Dependency Finder -> https://bit.ly/configure-pio-ldf
LDF Modes: Finder ~ chain, Compatibility ~ soft
Found 33 compatible libraries
Scanning dependencies...
No dependencies
Building in release mode
Compiling .pio\build\esp32doit-devkit-v1\src\main.cpp.o
Building .pio\build\esp32doit-devkit-v1\bootloader.bin
Generating partitions .pio\build\esp32doit-devkit-v1\partitions.bin
esptool.py v4.5.1
Creating esp32 image...
Merged 1 ELF section
Successfully created esp32 image.
Compiling .pio\build\esp32doit-devkit-v1\FrameworkArduino\Esp.cpp.o
Compiling .pio\build\esp32doit-devkit-v1\FrameworkArduino\FirmwareMSC.cpp.o
Compiling .pio\build\esp32doit-devkit-v1\FrameworkArduino\FunctionalInterrupt.cpp.o
Compiling .pio\build\esp32doit-devkit-v1\FrameworkArduino\HWCDC.cpp.o
Compiling .pio\build\esp32doit-devkit-v1\FrameworkArduino\HardwareSerial.cpp.o
Compiling .pio\build\esp32doit-devkit-v1\FrameworkArduino\IPAddress.cpp.o
Compiling .pio\build\esp32doit-devkit-v1\FrameworkArduino\IPv6Address.cpp.o
Compiling .pio\build\esp32doit-devkit-v1\FrameworkArduino\MD5Builder.cpp.o
Compiling .pio\build\esp32doit-devkit-v1\FrameworkArduino\Print.cpp.o
Compiling .pio\build\esp32doit-devkit-v1\FrameworkArduino\Stream.cpp.o
Compiling .pio\build\esp32doit-devkit-v1\FrameworkArduino\StreamString.cpp.o
Compiling .pio\build\esp32doit-devkit-v1\FrameworkArduino\Tone.cpp.o
Compiling .pio\build\esp32doit-devkit-v1\FrameworkArduino\USB.cpp.o
Compiling .pio\build\esp32doit-devkit-v1\FrameworkArduino\USBCDC.cpp.o
Compiling .pio\build\esp32doit-devkit-v1\FrameworkArduino\USBMSC.cpp.o
Compiling .pio\build\esp32doit-devkit-v1\FrameworkArduino\WMath.cpp.o
Compiling .pio\build\esp32doit-devkit-v1\FrameworkArduino\WString.cpp.o
Compiling .pio\build\esp32doit-devkit-v1\FrameworkArduino\base64.cpp.o
Compiling .pio\build\esp32doit-devkit-v1\FrameworkArduino\cbuf.cpp.o
Compiling .pio\build\esp32doit-devkit-v1\FrameworkArduino\esp32-hal-adc.c.o
Compiling .pio\build\esp32doit-devkit-v1\FrameworkArduino\esp32-hal-bt.c.o
Compiling .pio\build\esp32doit-devkit-v1\FrameworkArduino\esp32-hal-cpu.c.o
Compiling .pio\build\esp32doit-devkit-v1\FrameworkArduino\esp32-hal-dac.c.o
Compiling .pio\build\esp32doit-devkit-v1\FrameworkArduino\esp32-hal-gpio.c.o
Compiling .pio\build\esp32doit-devkit-v1\FrameworkArduino\esp32-hal-i2c-slave.c.o
Compiling .pio\build\esp32doit-devkit-v1\FrameworkArduino\esp32-hal-i2c.c.o
Compiling .pio\build\esp32doit-devkit-v1\FrameworkArduino\esp32-hal-ledc.c.o
Compiling .pio\build\esp32doit-devkit-v1\FrameworkArduino\esp32-hal-matrix.c.o
Compiling .pio\build\esp32doit-devkit-v1\FrameworkArduino\esp32-hal-misc.c.o
Compiling .pio\build\esp32doit-devkit-v1\FrameworkArduino\esp32-hal-psram.c.o
Compiling .pio\build\esp32doit-devkit-v1\FrameworkArduino\esp32-hal-rgb-led.c.o
Compiling .pio\build\esp32doit-devkit-v1\FrameworkArduino\esp32-hal-rmt.c.o
Compiling .pio\build\esp32doit-devkit-v1\FrameworkArduino\esp32-hal-sigmadelta.c.o
Compiling .pio\build\esp32doit-devkit-v1\FrameworkArduino\esp32-hal-spi.c.o
Compiling .pio\build\esp32doit-devkit-v1\FrameworkArduino\esp32-hal-time.c.o
Compiling .pio\build\esp32doit-devkit-v1\FrameworkArduino\esp32-hal-timer.c.o
Compiling .pio\build\esp32doit-devkit-v1\FrameworkArduino\esp32-hal-tinyusb.c.o
Compiling .pio\build\esp32doit-devkit-v1\FrameworkArduino\esp32-hal-touch.c.o
Compiling .pio\build\esp32doit-devkit-v1\FrameworkArduino\esp32-hal-uart.c.o
Compiling .pio\build\esp32doit-devkit-v1\FrameworkArduino\firmware_msc_fat.c.o
Compiling .pio\build\esp32doit-devkit-v1\FrameworkArduino\libb64\cdecode.c.o
Compiling .pio\build\esp32doit-devkit-v1\FrameworkArduino\libb64\cencode.c.o
Compiling .pio\build\esp32doit-devkit-v1\FrameworkArduino\main.cpp.o
Compiling .pio\build\esp32doit-devkit-v1\FrameworkArduino\stdlib_noniso.c.o
Compiling .pio\build\esp32doit-devkit-v1\FrameworkArduino\wiring_pulse.c.o
Compiling .pio\build\esp32doit-devkit-v1\FrameworkArduino\wiring_shift.c.o
Archiving .pio\build\esp32doit-devkit-v1\libFrameworkArduino.a
Indexing .pio\build\esp32doit-devkit-v1\libFrameworkArduino.a
Linking .pio\build\esp32doit-devkit-v1\firmware.elf
Retrieving maximum program size .pio\build\esp32doit-devkit-v1\firmware.elf
Checking size .pio\build\esp32doit-devkit-v1\firmware.elf
Advanced Memory Usage is available via "PlatformIO Home > Project Inspect"
RAM:   [=         ]   6.5% (used 21416 bytes from 327680 bytes)
Flash: [==        ]  20.2% (used 265045 bytes from 1310720 bytes)
Building .pio\build\esp32doit-devkit-v1\firmware.bin
esptool.py v4.5.1
Creating esp32 image...
Merged 2 ELF sections
Successfully created esp32 image.
===================================================== [SUCCESS] Took 15.27 seconds =====================================================
 *  Terminal will be reused by tasks, press any key to close it.
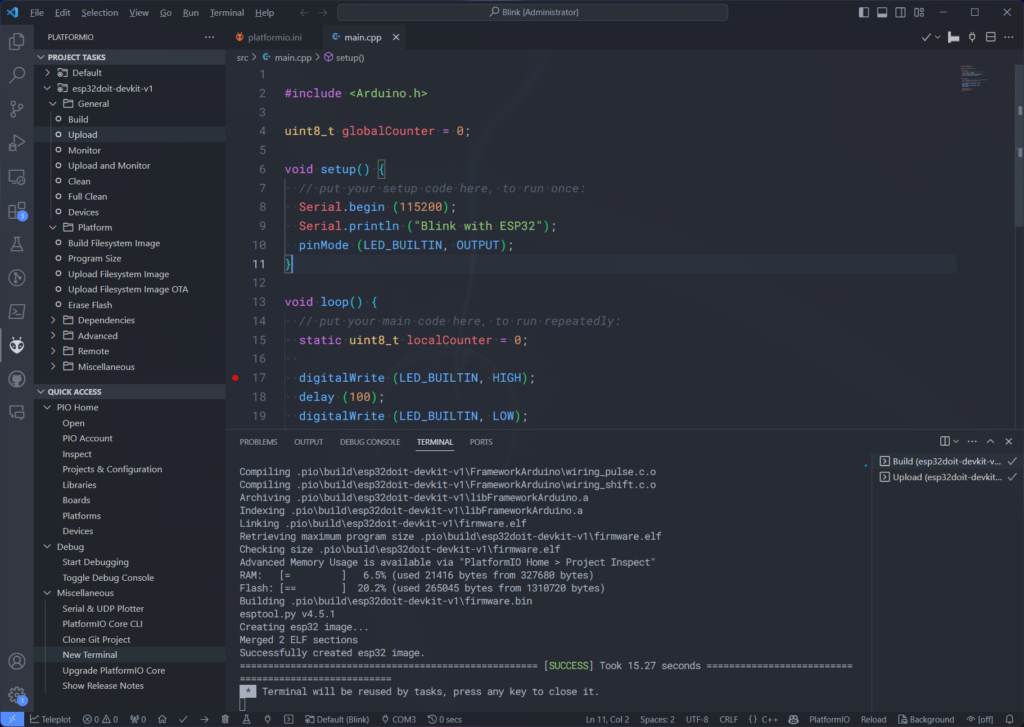
From the log, you can see that our Blink project is using 6.5% (or 21416 bytes) of the RAM and 20.2% (or 265045 bytes) of Flash memory.
Uploading
Uploading is the process of transferring compiled binary files to the memory of the target embedded system. The DOIT DevKit board has 4 MB of flash memory to store user programs. The serial bootloader in the ESP32 microcontroller helps us to upload the firmware through the UART port without using any dedicated programmer/debugger tool. PlatformIO supports multiple upload protocols and programmer tools.
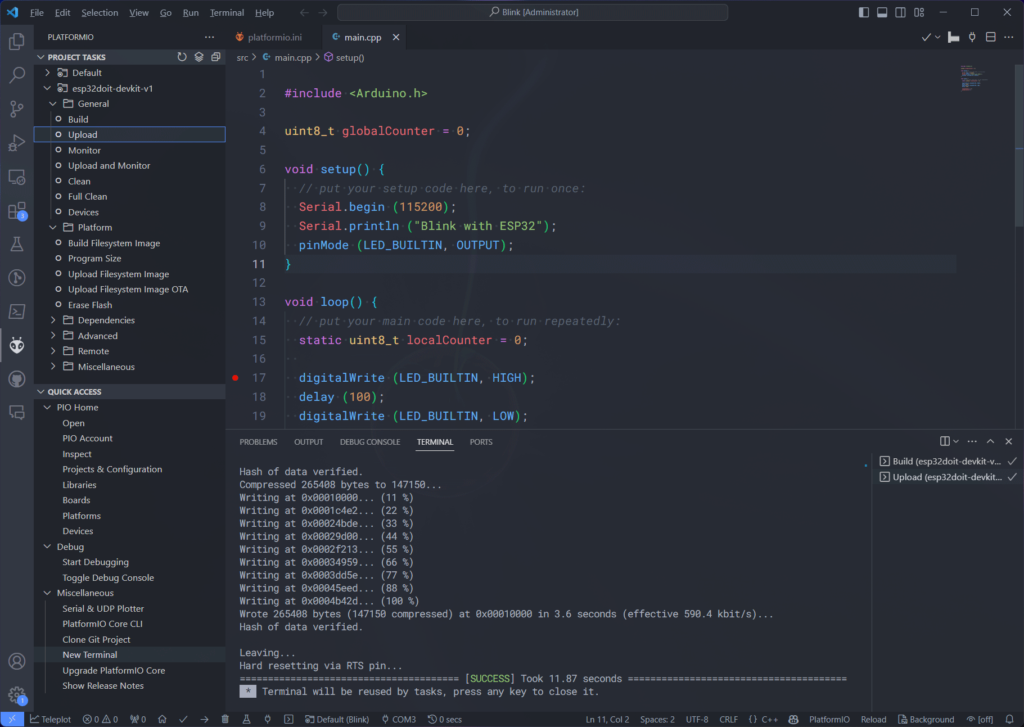
To upload the code, you can use the Upload option in the PROJECT TASKS menu or click the button on the bottom panel of VS Code that says PlatformIO: Upload. Following is the PlatformIO upload log.
 *  Executing task: C:\.PIO\penv\Scripts\platformio.exe run --target upload --environment esp32doit-devkit-v1 --upload-port COM3

Processing esp32doit-devkit-v1 (platform: espressif32; board: esp32doit-devkit-v1; framework: arduino)
-------------------------------------------------------------------------------------------------------------
Verbose mode can be enabled via `-v, --verbose` option
CONFIGURATION: https://docs.platformio.org/page/boards/espressif32/esp32doit-devkit-v1.html
PLATFORM: Espressif 32 (6.4.0+sha.f6ec392) > DOIT ESP32 DEVKIT V1
HARDWARE: ESP32 240MHz, 320KB RAM, 4MB Flash
DEBUG: Current (cmsis-dap) External (cmsis-dap, esp-bridge, esp-prog, iot-bus-jtag, jlink, minimodule, olimex-arm-usb-ocd, olimex-arm-usb-ocd-h, olimex-arm-usb-tiny-h, olimex-jtag-tiny, tumpa)
PACKAGES:
 - framework-arduinoespressif32 @ 3.20011.230801 (2.0.11)
 - tool-esptoolpy @ 1.40501.0 (4.5.1)
 - tool-mkfatfs @ 2.0.1
 - tool-mklittlefs @ 1.203.210628 (2.3)
 - tool-mkspiffs @ 2.230.0 (2.30)
 - toolchain-xtensa-esp32 @ 8.4.0+2021r2-patch5
LDF: Library Dependency Finder -> https://bit.ly/configure-pio-ldf
LDF Modes: Finder ~ chain, Compatibility ~ soft
Found 33 compatible libraries
Scanning dependencies...
No dependencies
Building in release mode
Retrieving maximum program size .pio\build\esp32doit-devkit-v1\firmware.elf
Checking size .pio\build\esp32doit-devkit-v1\firmware.elf
Advanced Memory Usage is available via "PlatformIO Home > Project Inspect"
RAM:   [=         ]   6.5% (used 21416 bytes from 327680 bytes)
Flash: [==        ]  20.2% (used 265045 bytes from 1310720 bytes)
Configuring upload protocol...
AVAILABLE: cmsis-dap, esp-bridge, esp-prog, espota, esptool, iot-bus-jtag, jlink, minimodule, olimex-arm-usb-ocd, olimex-arm-usb-ocd-h, olimex-arm-usb-tiny-h, olimex-jtag-tiny, tumpa
CURRENT: upload_protocol = esptool
Looking for upload port...
Using manually specified: COM3
Uploading .pio\build\esp32doit-devkit-v1\firmware.bin
esptool.py v4.5.1
Serial port COM3
Connecting..............
Chip is ESP32-D0WD-V3 (revision v3.0)
Features: WiFi, BT, Dual Core, 240MHz, VRef calibration in efuse, Coding Scheme None
Crystal is 40MHz
MAC: 34:ab:95:48:94:78
Uploading stub...
Running stub...
Stub running...
Changing baud rate to 460800
Changed.
Configuring flash size...
Flash will be erased from 0x00001000 to 0x00005fff...
Flash will be erased from 0x00008000 to 0x00008fff...
Flash will be erased from 0x0000e000 to 0x0000ffff...
Flash will be erased from 0x00010000 to 0x00050fff...
Compressed 17536 bytes to 12203...
Writing at 0x00001000... (100 %)
Wrote 17536 bytes (12203 compressed) at 0x00001000 in 0.5 seconds (effective 261.0 kbit/s)...
Hash of data verified.
Compressed 3072 bytes to 146...
Writing at 0x00008000... (100 %)
Wrote 3072 bytes (146 compressed) at 0x00008000 in 0.1 seconds (effective 449.1 kbit/s)...
Hash of data verified.
Compressed 8192 bytes to 47...
Writing at 0x0000e000... (100 %)
Wrote 8192 bytes (47 compressed) at 0x0000e000 in 0.1 seconds (effective 704.2 kbit/s)...
Hash of data verified.
Compressed 265408 bytes to 147150...
Writing at 0x00010000... (11 %)
Writing at 0x0001c4e2... (22 %)
Writing at 0x00024bde... (33 %)
Writing at 0x00029d00... (44 %)
Writing at 0x0002f213... (55 %)
Writing at 0x00034959... (66 %)
Writing at 0x0003dd5e... (77 %)
Writing at 0x00045eed... (88 %)
Writing at 0x0004b42d... (100 %)
Wrote 265408 bytes (147150 compressed) at 0x00010000 in 3.6 seconds (effective 590.4 kbit/s)...
Hash of data verified.

Leaving...
Hard resetting via RTS pin...
======================================= [SUCCESS] Took 11.87 seconds =======================================
 *  Terminal will be reused by tasks, press any key to close it.
Debugging
PlatformIO supports out-of-the-box debugging with targets that support some kind of debugging. All you need to do is connect your microcontroller board with a suitable debug probe and configure it in the platformio.ini file. Some boards like the ST Nucelo boards come with built-in ST-Link debugger so that you don’t need a separate tool for debugging. If you want to learn how you can debug ESP32 microcontroller projects with the official ESP-Prog JTAG debugger, we have a dedicated tutorial for it.
Debugging ESP32 Arduino & ESP-IDF Projects using ESP-Prog and PlatformIO
Adding Libraries
One thing that is very important for any embedded software development project is the ability to add external libraries to your projects, so that you can save time on writing a lot of code. Luckily, PlatformIO maintains a registry of open-source libraries on its website. This repository has all published Arduino libraries as well as from other sources. When a library is published by the Arduino library index, it is automatically added to the PlatformIO library registry. In this section, we will explain the different methods of adding libraries to your PlatformIO projects.
Library Repository
It is easy to add a library from the official library repository to your projects. You can open the project configuration window and search for “lib_deps” in the New Option: box. lib_deps is the configuration key that we can use to specify the library dependencies of our project. As soon as you click on the lib_deps option, a new configuration is added to your working configuration.

Now click on the + Add Library button and search for your favourite library. In this case, we are going to search for the ptScheduler library by Vishnu Mohanan (@vishnumaiea). Search for “ptscheduler” and the list will show you the libraries available on the library registry.
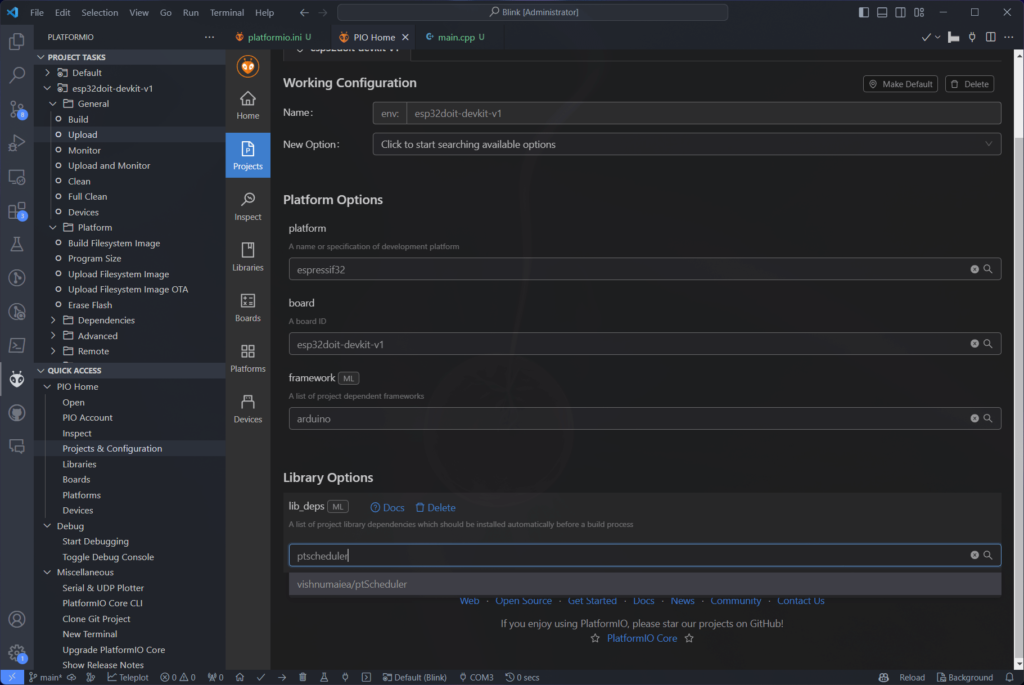
Once you select the library you need PlatformIO will fetch the latest version of the library. In this case, the latest version of ptScheduler is 2.2.0 and the ^ symbol tells PIO to use a version greater than or equal to the current version. So if a new version is released after you add the library, PIO will update it automatically. However, if you don’t need to automatically update a library but stick with an exact version, you can remove the ^ character.
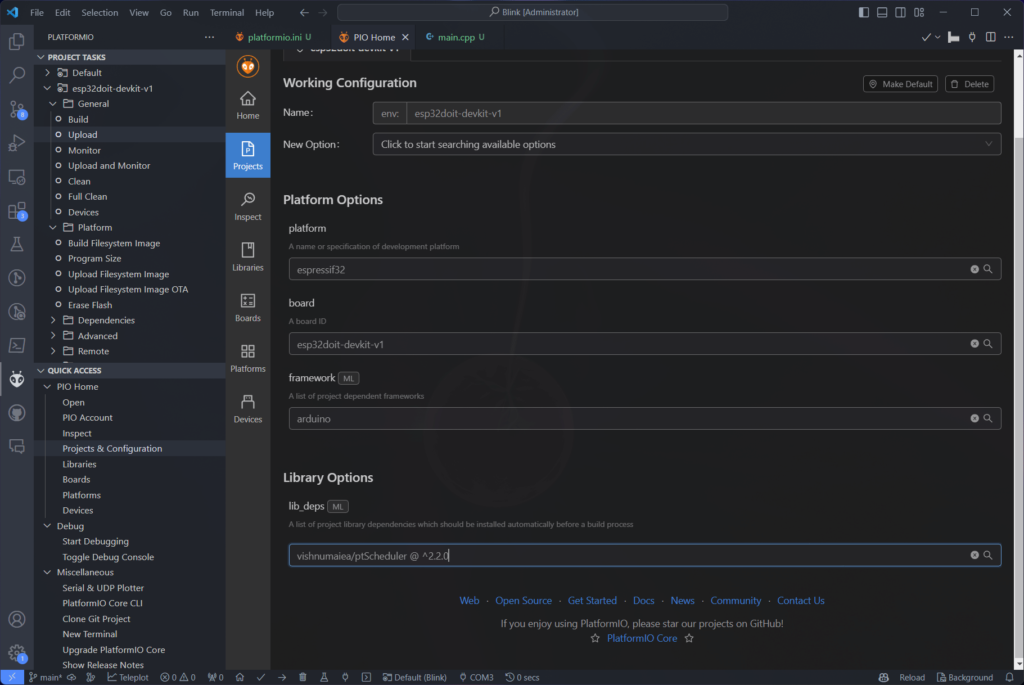
You need to press the Enter key in order to add the library to the configuration. Now you can search for other libraries and add them to the working configuration, if needed. Once all the libraries are added, click on the Save button on the top-right corner. This will write the modifications to the platformio.ini file. You will see a VS Code notification that says PIO is configuring your project. Do not press the Cancel button at that time. Allow PIO to complete the configuration process. After adding the ptScheduler library, our configuration file looks like the following.

Open Library
What if the library you need is not available in the registry because the author never published it? Such libraries that are available in places like GitHub but not in the library registry can be easily added to your PlatformIO projects. You can either download the entire library as a ZIP file and extract it to the lib directory in the project root folder. When you add libraries through this method, you are able to edit the library if you want, and the modifications will be preserved. PIO won’t automatically update the library files.
Another way is to copy the git link and paste it to the platformio.ini file. PIO will then clone the repository to your lib folder. If you make any changes to such libraries, PIO may overwrite those changes at times. So if you want to modify the libraries you want to use and keep the changes, use the previous method. Following is our configuration file after adding the Arduino SD card library, to show you an example.
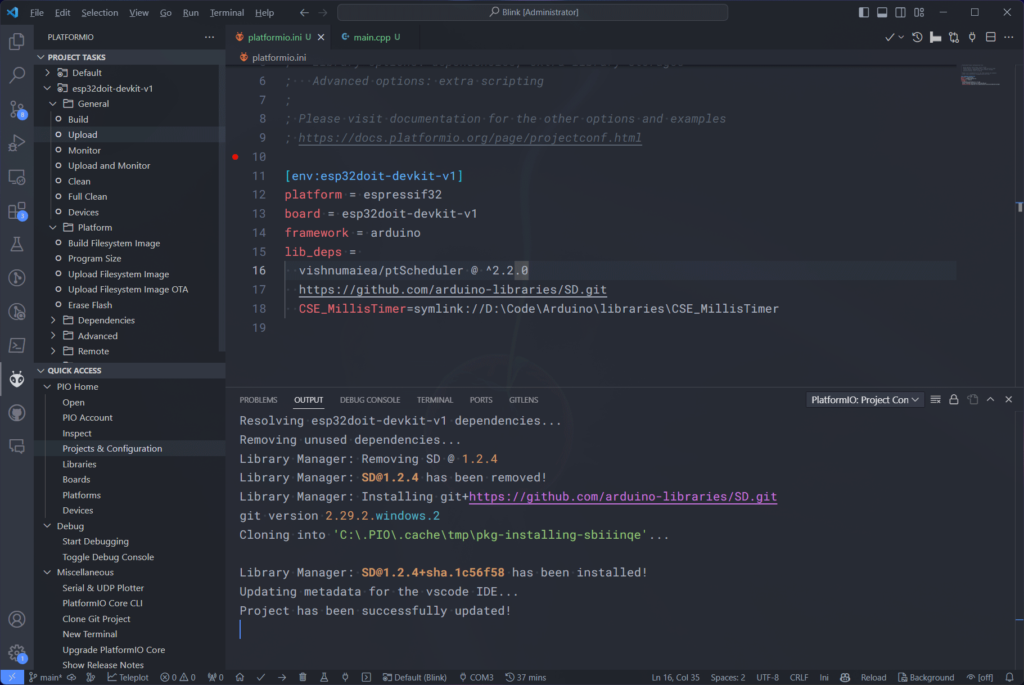
As you can see, the new library value is added on a new line. In this way, we can add any number of values to a configuration key.
Local Library
What if you already have the library you need on your system and want to use it with your PlatformIO project? For example, you may already have the library in your Arduino libraries folder. In that case, you can copy the library folder to the lib directory of your PlatformIO project to use it. But what if you are the author of an Arduino library and you don’t want to create multiple instances of your library all over your system? The solution is to add a library as a symlink (symbolic link). symlink libraries can reside anywhere on your system and don’t need to be present in the lib folder. We use this method when developing Arduino libraries. Any changes you make to the library will immediately be in effect in all PIO projects that use a symlink to that library. The following screenshot shows how we added our CSE_MillisTimer library to the project.
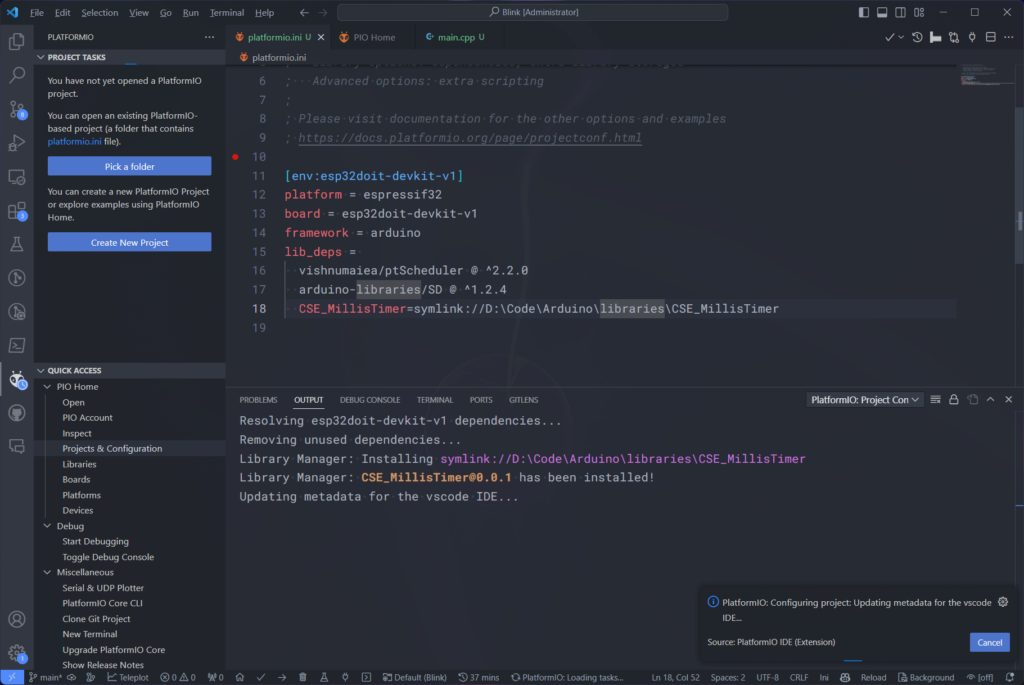
The full path of the library in this case is D:\Code\Arduino\libraries\CSE_MillisTimer. You can also use relative paths if you want to maintain library dependencies even when you change project locations, or share a project with a friend as a ZIP file or a shared Git repository.
Source Control
Source revision control natively supported by VS Code. You can use Git-based source control for your PlatformIO projects as well. Click on the Source Control button from the left pane and click on Initialize Repository to create a local Git repository.
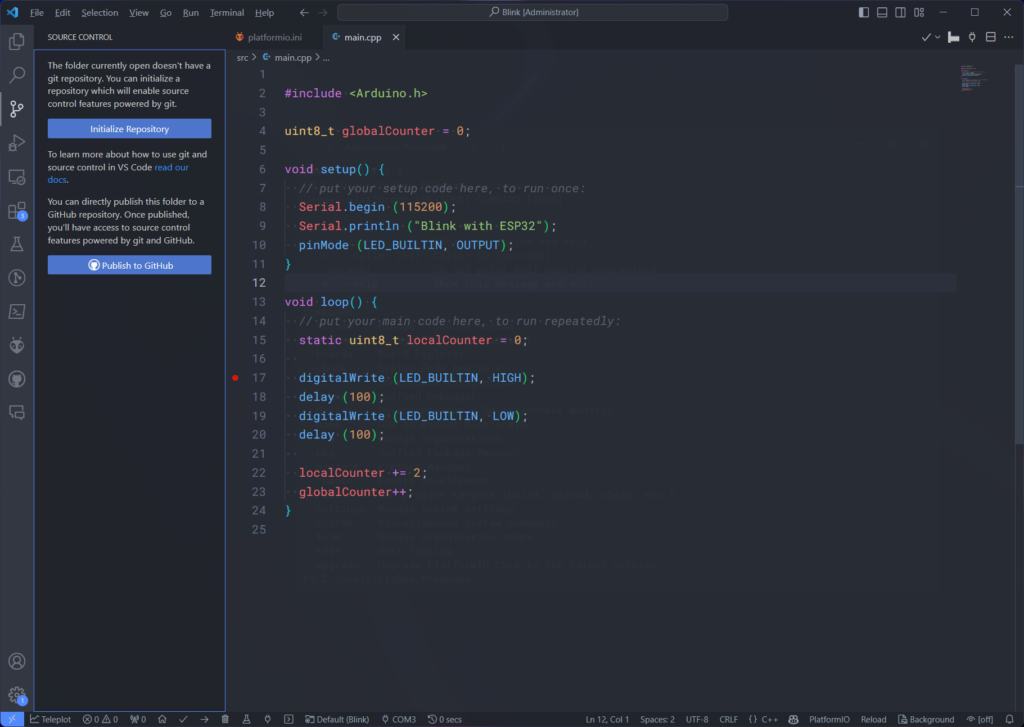
This will create a new folder called .git and a .gitignore file in the root directory. The .gitignore file is used to exclude certain folders and files from source control. This is usually done to temporary configuration files.
.pio
.vscode/.browse.c_cpp.db*
.vscode/c_cpp_properties.json
.vscode/launch.json
.vscode/ipchGet Support
PlatformIO is an open-source software project that is actively being developed. You might encounter bugs when using it. If you find bugs you can create an issue in the GitHub repository by including all the details necessary and steps to reproduce the bug. You can include the working configuration (platformio.ini), logs, and screenshots. It will help others to better understand the issue and suggest solutions.
But if you are unsure if you are dealing with a bug or doing something wrong on your own, try posting the issue to the PlatformIO Community. The forum has so many active users and you will get answers in a short time. Remember to precisely explain your problem and include the necessary details.
If you want to learn more about PlatformIO, use the awesome official documentation. The documentation is also open-source. So if you want to improve the documentation simply submit a pull-request.
The aim of this tutorial was to give you a basic introduction to the awesome PlatformIO embedded development ecosystem. If you are currently using the Arduino IDE or ancient and slow IDEs from the manufacturers, we highly recommend trying out PlatformIO. Once you get the hang of it, you will never go back to other IDEs. Of course, PlatformIO is not perfect, but it is continuously being updated with a better user experience in mind. The same goes with VS Code. Let us know us know your experience with PlatformIO and if you have any feedback, post it in the comments. Happy Coding 🖥️
Links
- PlatformIO – Home Page
- PlatformIO – Community
- PlatformIO – Documentation
- PlatformIO VS Code Extension
Short Link
- Short URL to this page – https://www.circuitstate.com/getstartpio

