ptScheduler : A Minimal Cooperative Task Scheduler for Arduino

When was the last time you used the delay() function? Must be not too long ago. We use delay functions for blinking lights, activating buzzers, push-button debouncing and so on. But you would know this too – using delay functions also prevents the microcontroller from doing anything useful. This is because ordinary delay functions are implemented using NOP or No Operation assembly instructions. When you specify a delay time in some unit such as milliseconds, a certain number of NOP operations are executed to skip an equivalent amount of clock cycles. The MCU does nothing else in this period. That is precious clock cycles or computing time wasted. Such a delay creates a blocking code.
How to write non-blocking code with ptScheduler?
So what is a better alternative? What if we could do other things while we wait for a delay time to elapse? Some of you might already know to implement this using millis() or micros() functions. These functions are implemented using timer-based interrupts. For example, the millis() function increments a global counter variable when a timer is overflown every millisecond. That means, your application code is interrupted every millisecond for a very short amount of time to increment the counter. The value of this counter variable can be used to determine if a certain amount of time has elapsed. An example code would look like this,
int entryTime = 0;

void setup() {
  Serial.begin(9200);
}

void loop() {
  if ((millis() - entryTime) >= 1000) {  //if a second is elapsed
    Serial.println("Time elapsed");  //prints every second
    entryTime = millis();  //save the next entry point
  }
}
If you want multiple such tasks, you have to create a unique variable such as entryTime for each task. Also, if you want to change the time during execution, you also need a variable for that. This can bloat your code and make it complicated and difficult to understand. ptScheduler is a library that does everything you could do with millis() or micros() functions, while keeping your code simple and intuitive.
Let’s start with a basic “Hello World” example.
include "ptScheduler.h"

//create tasks
ptScheduler sayHello = ptScheduler(1000000);  //time in microseconds

//setup function runs once
void setup() {
  Serial.begin(9600);
}

//infinite loop
void loop() {
  if (sayHello.call()) {  //executed every second
    Serial.println("Hello World");
  }
  //add other tasks and non-blocking code here
}
The sayHello is a new ptScheduler task configured to run once every second. Then, in the loop function, we can invoke the task using the call() function. It checks if the preset time has elapsed. The if statement repeatedly calls this function in the loop. Whenever the time elapsed is one second, the code under the if clause is executed. Otherwise, it is skipped.
You can add other non-blocking code or other tasks in the same loop function. Any number of tasks can be run at any intervals, given that you have enough resources. Let’s have a look at an example with a few more functions.
include "ptScheduler.h"

//create tasks
ptScheduler sayHello = ptScheduler(1000000);  //1 second
ptScheduler blinkLed = ptScheduler(500000);  //500 ms

//setup function runs once
void setup() {
  Serial.begin(9600);
  pinMode(LED_BUILTIN, OUTPUT);
}

//infinite loop
void loop() {
  if (sayHello.call()) {  //executed every second
    Serial.println("Hello World");
  }

  if (blinkLED.call()) {
    digitalWrite(LED_BUILTIN, !digitalRead(LED_BUILTIN));  //toggle LED
  }

  Serial.println(analogRead(A0));  //some continuous task
}
We have three tasks here, of which two are ptScheduler tasks. sayHello prints “Hello World” once every second. blinkLed will toggle the inbuilt LED of an Arduino every half second. The analogRead function is not a timed task and it is executed every time loop() function is executed.
How does it work?
ptScheduler uses the native micros() implementation of Arduino. The micros() function is a timer-based ISR (Interrupt Service Routine) that increments a global counter variable (32-bit unsigned integer) every microsecond. Calling the micros() function will return the current value of the counter. Since Arduino implements the counter as a 32-bit unsigned integer, the counter will overflow every 71.582788266667 minutes. But ptScheduler is written with a workaround to overcome such overflow events and support up to 18446744000000000000 microseconds (584,942.42 years).
When you create a new ptScheduler object, you can specify the time intervals and execution modes. The time interval is stored in a variable or in an array and is compared to the time elapsed since the last time the task was executed. For example, if the time period for a oneshot task is 1000 milliseconds, the value is stored in a list called intervalList and is compared to the elapsed time every time the associated call() function is invoked. If the elapsed time is less than 1000 ms, call() will return false. If the elapsed time is equal to or greater than 1000 ms, call() will return true. This will cause the code under the conditional clause to be executed once. The current value returned by the micros() will now be saved as the new entry point to calculate the elapsed time. The next time you invoke call() and if the elapsed time is less than 1000 ms, the function will again return false. This kind of task where the code is executed only once after every time interval is called a Oneshot task. You might want to execute a task continuously for a specific time period and then sleep for another time period. It is possible with Spanning tasks. In addition to these basic types of tasks, ptScheduler allows you to alter many other behaviors of a task on the fly.
Advantages
- Write non-blocking periodic tasks with any number of custom-length intervals and iterations.
- Custom delay before task execution.
- There exist many task schedulers and RTOSs for microcontroller platforms. Some of them are hard to use and consume a good amount of your flash and RAM. But ptScheduler is a low footprint library without any advanced features but allows you to write periodic tasks easily.
- Write clean and intuitive code.
- There is no overhead of context switching, callbacks, or intensive dynamic memory management. ptScheduler uses just enough state variables to run your tasks and is executed by invoking a single
call()function. - The order of execution of tasks is fixed and deterministic. For example, if two tasks get their interval times elapsed around the same time, the task that appears first on your code will be executed first. There is no concept of dynamic queues or priorities.
- Dynamically change the behavior of a task by manipulating the state variables and counters.
- ptScheduler can be stripped down to remove all unwanted modes and thus reducing code size.
- ptScheduler tasks can coexist with preemptive RTOS tasks (such as FreeRTOS tasks).
- ptScheduler is safe from
micros()overflow issues.
Limitations
- ptScheduler is not a replacement for a proper RTOS and doesn’t have advanced features.
- There is no guarantee that your task will be executed at exact intervals. If another task takes a long time to complete, it can delay all other tasks.
- You have to poll the
call()function continuously to determine when to run your task. - Does not work when interrupts are disabled globally, because doing so will also prevent the
millis()function from running.
Installation
To install ptScheduler to your computer,
- Method 1: Using git, clone this repository to your default Arduino
librariesfolder in your root workspace folder. - Method 2: Download the repository as a ZIP file and extract it to the
librariesfolder. - Method 3: Install directly from Arduino IDE’s library manager.
ptScheduler is now part of the official Arduino library list. If you have Arduino IDE open, restart it. Under Sketch → Include Library you will see the ptScheduler library in the Contributed libraries category. That means the library is installed correctly.
To use the examples, go to File → Examples → ptScheduler and open an example sketch you like. The basic operation is demonstrated in the Hello-World.ino and Basic.ino sketches.
Task Modes
Oneshot Task
This is the type of task that is executed only once every time interval. This is useful for tasks such as blinking an LED every second, or printing a message to the serial monitor, or polling a sensor, etc. Let’s see how a oneshot task with a single interval works.
ptScheduler sayHello = ptScheduler(1000000); //time in microseconds- The default task mode is
PT_MODE_ONESHOTand the time interval is 1 second. This value is saved as the first value on an interval sequence list. An interval sequence is a set of repeating intervals, saved as an array. - When you first invoke
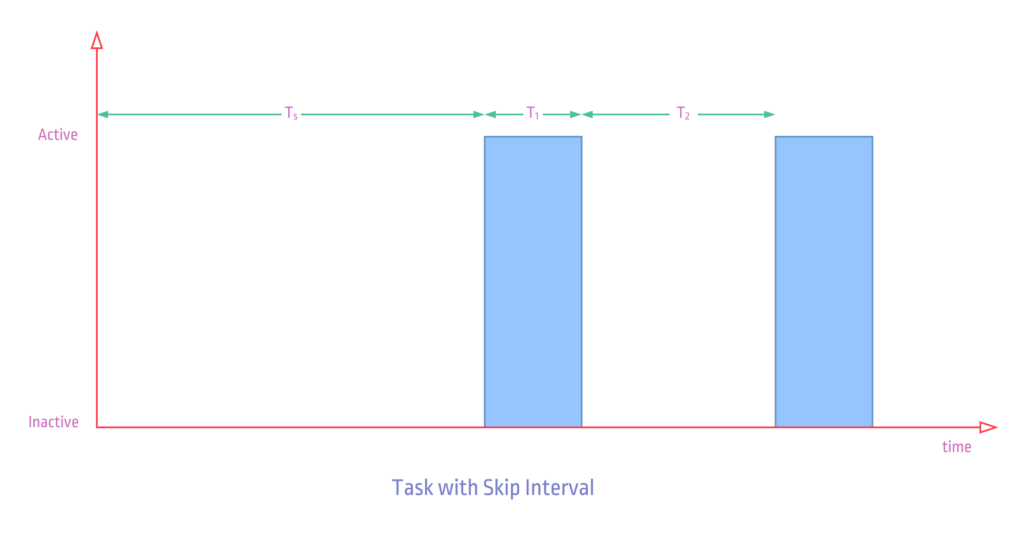
sayHello.call(), the value returned bymicros()will be saved toentryPointvariable. Thecall()will also immediately returntruesince it is the first time we are invoking the task. TheexecutionCounteris incremented from 0 to 1. If you do not want the task to returntruewhen starting the task, you can set a pre-task delay usingsetSkipTime()function. This will cause the task to wait until the skip time is elapsed, before returningtrue. - If you invoke
sayHello.call()again within one second of the last call, the value returned bygetTimeElapsed()will be compared against the previously savedentryPointand the difference is saved inelapsedTime. If the difference is less than 1 second,call()immediately returnsfalse. There will be no changes to any other variables at this point. - If you invoke
sayHello.call()one second after the first call, the value returned bygetTimeElapsed()is again compared againstentryPoint. The difference is saved inelapsedTimeand if the value is greater than or equal to 1 second,call()will immediately returntrue. It will also save the new value returned bymicros()toentryPointfor the next cycle, resetelapsedTimeto 0, and incrementexecutionCounterby 1. - If the
sequenceRepetitionvalue is 0, the above-explained cycle repeats indefinitely. If you want to stop the task after a finite number of cycles, you can setsequenceRepetitionby callingsetSequenceRepetition(<value>)function. The task will automatically suspend or disable itself (determined bysleepMode) after the specified number of repetitions.
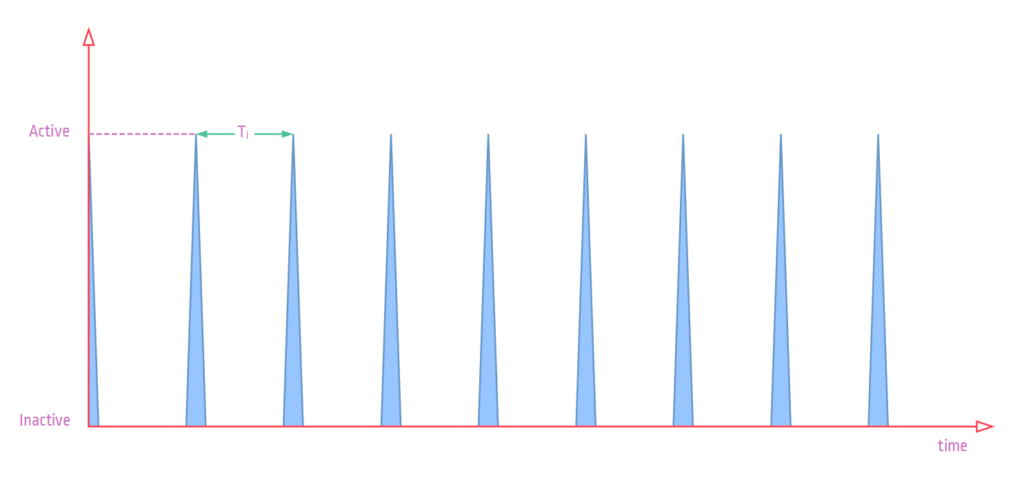
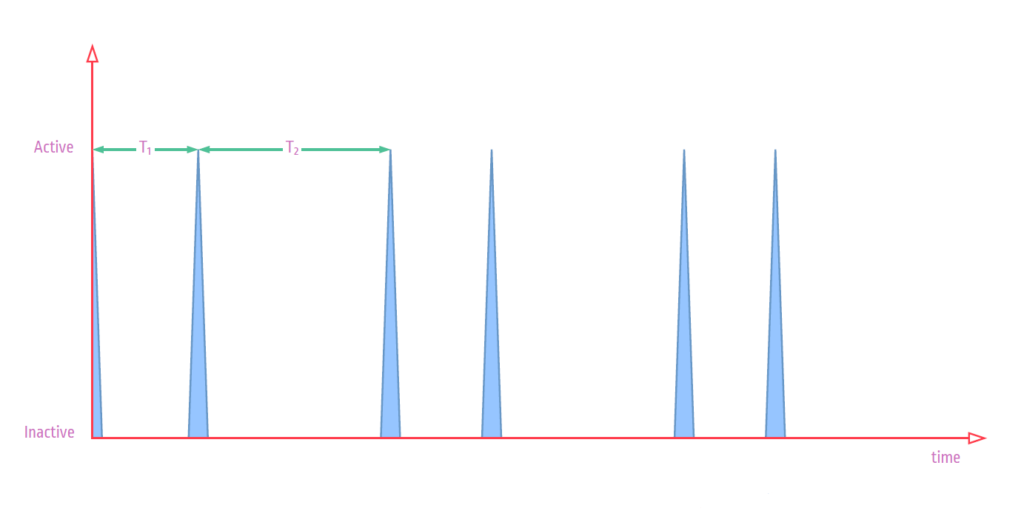
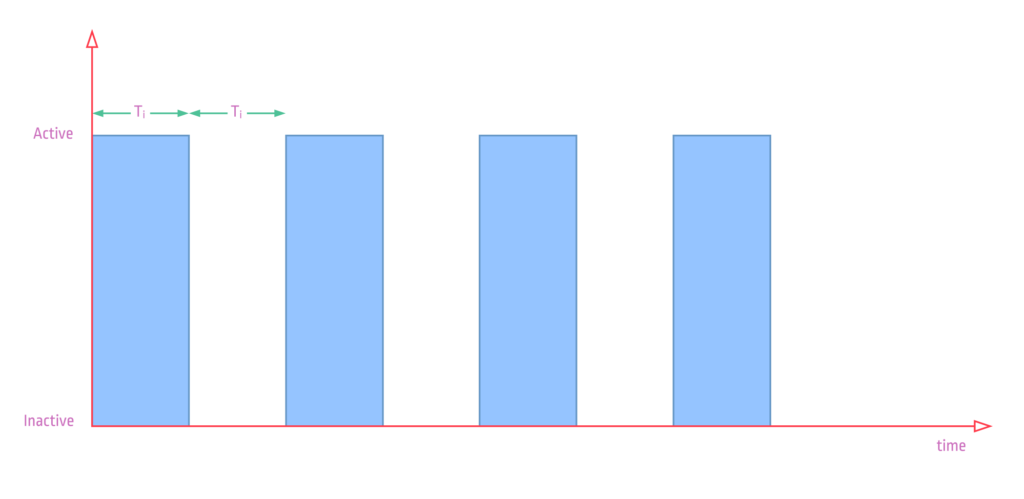
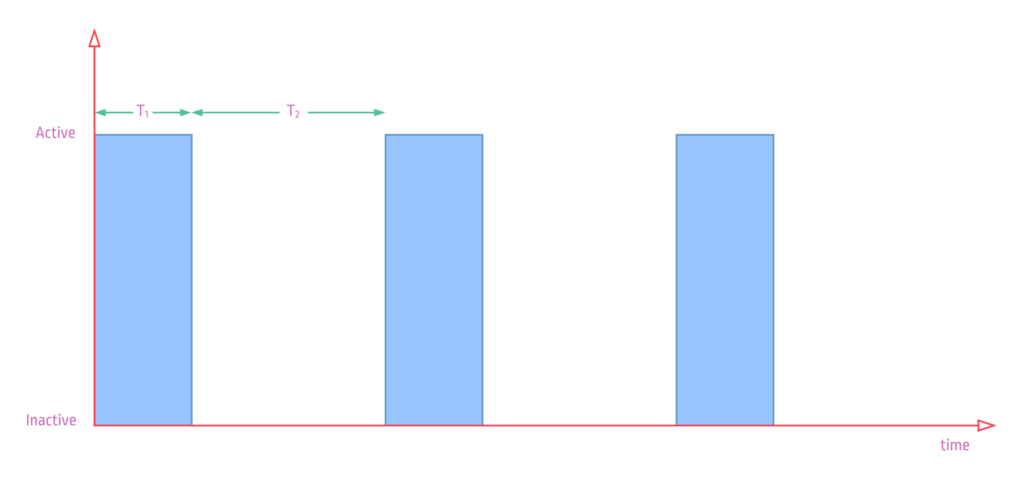
During the Active time, the call() will return true, and will return false during the inactive time. Ti is the time interval of the task.A task can also have multiple intervals in a sequence. Below shows a task with two different intervals T1 and T2.
Spanning Task
Spanning tasks, as the name suggests, span over an interval. The output of a spanning task remains true for one duration and remains false for the next duration. Spanning tasks are useful when you want to continuously perform some operations, in a repeating cycle. Let’s see how a spanning task works.
ptScheduler spanningTask = ptScheduler(PT_MODE_SPANNING, 1000000);- The task mode is
PT_MODE_SPANNINGand the time interval is 1 second. This value is saved as the first value on an interval sequence list. An interval sequence is a set of repeating intervals, saved as an array. - When you first invoke
spanningTask.call(), the value returned bymicros()will be saved toentryPointvariable. Thecall()will also immediately returntruesince it is the first time we are invoking the task. If you do not want the task to returntruewhen starting the task, you can set a pre-task delay usingsetSkipTime()function. This will cause the task to wait until the skip time is elapsed, before returningtrue. - If you invoke
sayHello.call()again within one second of the last call, the value returned bygetTimeElapsed()will be compared against the previously savedentryPointand the difference is saved inelapsedTime. If the difference is less than 1 second,call()immediately returnstrue. There will be no changes to any other variables at this point. - If you invoke
sayHello.call()one second after the first call, the value returned bygetTimeElapsed()is again compared againstentryPoint. The difference is saved inelapsedTimeand if the value is greater than or equal to 1 second,call()will immediately returnfalse. This completes an interval cycle for spanning task. It will also save the new value returned bymicros()toentryPointfor the next cycle, resetelapsedTimeto 0, and incrementexecutionCounterby 1. - If the
sequenceRepetitionvalue is 0, the above-explained cycle repeats indefinitely. If you want to stop the task after a finite number of cycles, you can setsequenceRepetitionby callingsetSequenceRepetition(<value>)function. The task will automatically suspend or disable itself (determined bysleepMode) after the specified number of repetitions.
Documentation
The complete documentation is available at GitBook, including all function and variable references. Choose the version of documentation corresponding to the version of the library you’re using.
